
Every website you enter on the Internet has many links. Two types of links are internal and external links. The difference between them is that internal links are a type of hyperlink that goes to the same domain, whereas external links go to a different domain.
Websites have thousands of links, and it is nearly impossible to modify all of them by hand. This is where WP Links comes in and saves the day.
WP Links is a WordPress plugin that allows you to control links. Right now, we are focusing on external links, and I am going to show you in detail how WP Links will make your life easier and help you control and maintain your external links.
Table of Contents
External Links
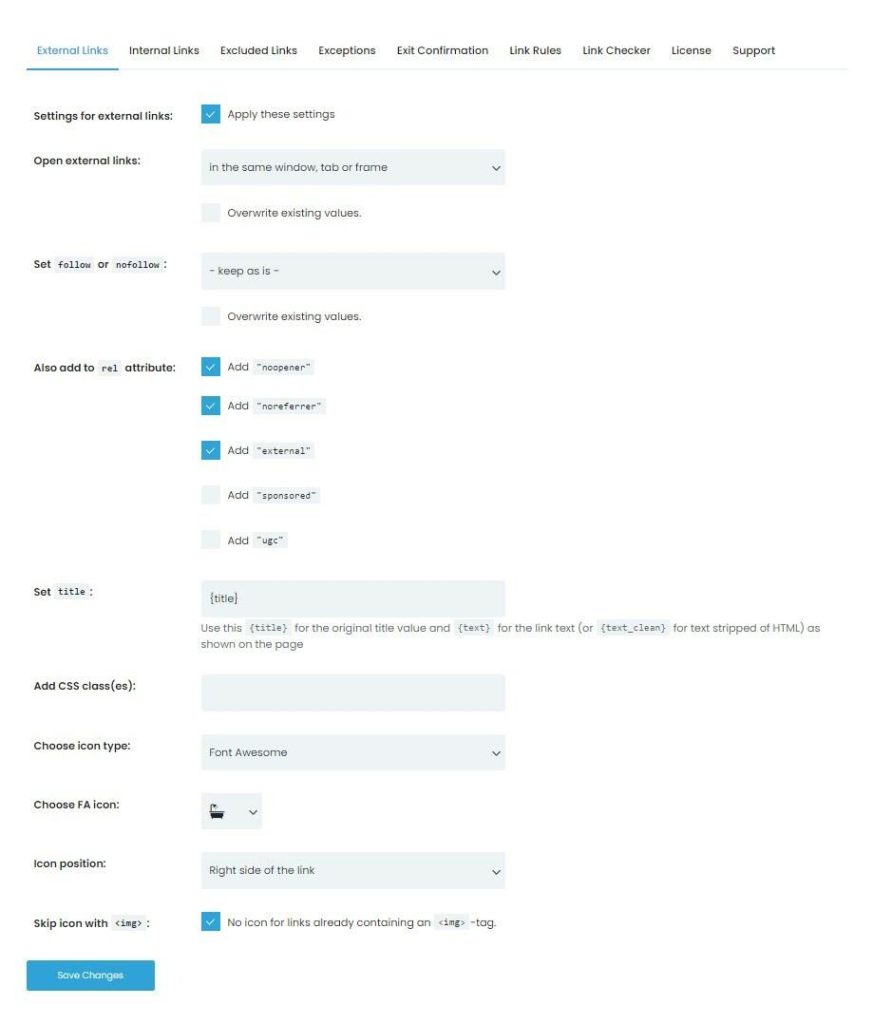
The first thing we are going to debunk in detail is external links. There are many options and settings to choose from. This way, it is very easy to modify all of your external links at once.
The first option you’re welcome with is choosing where you want to open external links, and you can choose to open them in the same window, tab, frame, or separate ones. You also have options to open them all in the same window or the topmost frame, but these are not recommended options.
The next part is setting them to “follow” or “nofollow” types of links, which you can add to the rel attribute. Here, options are “external”, “noopener”, “norefferer” and you can also choose “sponsored” and “ugc”. You can, amongst these other options, modify your title and text as well and choose what you want to write and what your title will be. You can also add CSS classes, and last but not least, choose an icon.
You can choose from an Image, Dashicon, or Font Awesome, and when you click on any of these, you can choose which one you want them to be and where you want to position them.
Exit Confirmation
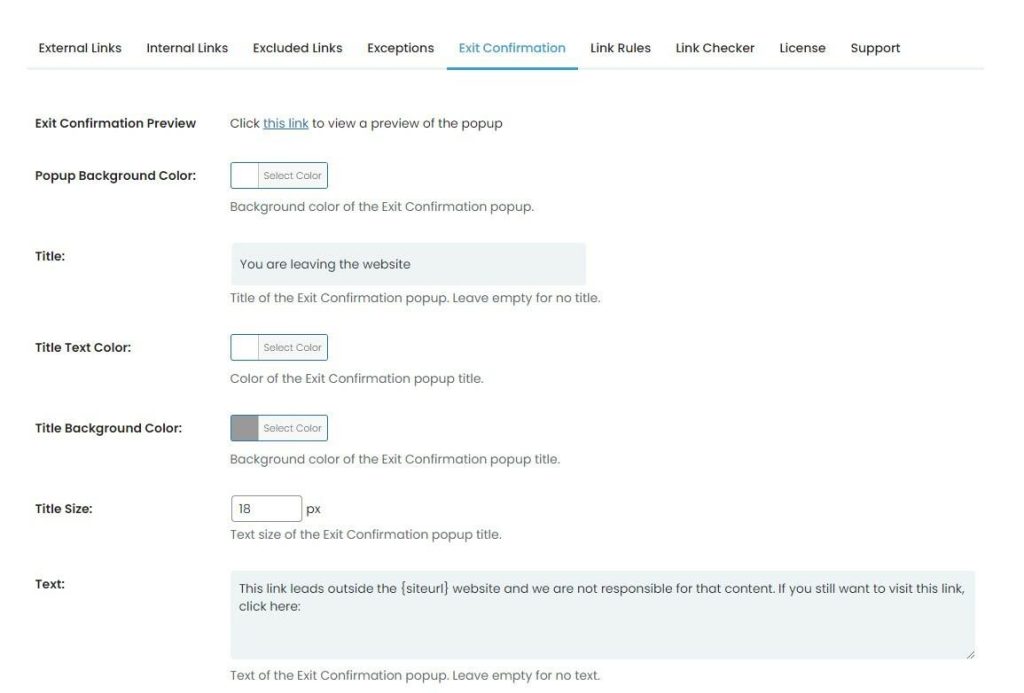
Exit Confirmation comes into handy when we are talking about external links. With Exit Confirmation, you are designing the popup that will let it be known to the users that they are leaving your site and going to another one.
You can choose the popup color from a wheel of colors as well as ‘its title. You can write what you want to be ‘its’ title and then choose the title text and background color as well as ‘its’ size.
Text is the next thing you can modify, and you can, again, choose what you want the text to be and choose the color and size. When it comes to modifying the popup itself, not only can you choose the color of the popup, but you can choose its” width and height as well. You can also choose to have a transparent overlay behind the popup.
If you want to give users a chance to stay on the website, you can make a button for that. When it comes to the button, you can choose the text, size, color, and background of the button. When you are done and you like everything that you have chosen, you just click on “Save changes.”
Link Rules
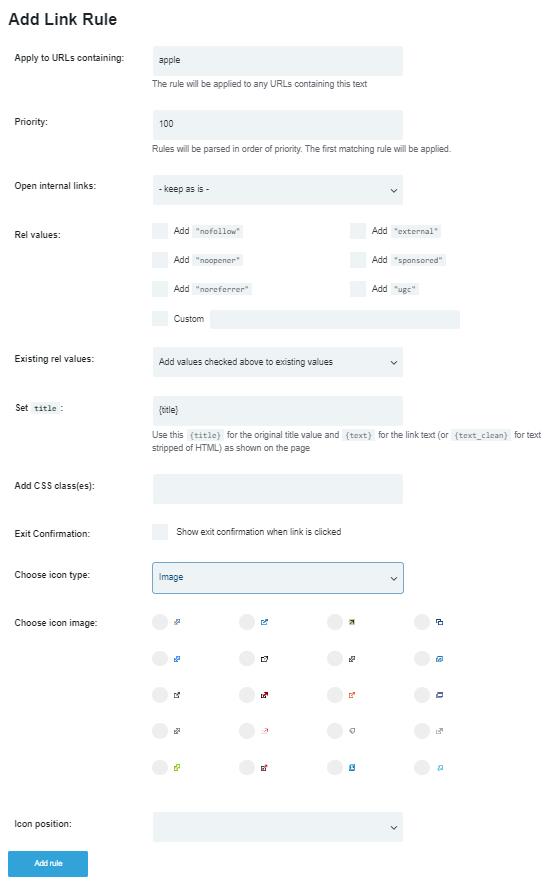
When it comes to link rules, you can choose which word you want to search, but you can add rules so when you search something up, it will be modified according to those rules.
The first option when it comes to Link Rules is applying to URLs where you can choose a word, and it will be applied to all URLs containing that word. Priority is important because rules will be parsed in order of priority. The next option is dedicated to internal links, and you can choose where you want to open them.
Not only that, but you can add a rel attribute as well and choose any of the suggested ones or make a custom one. After choosing which rel attributes you want to add, you can choose which ones you want to add. You have many options here, and amongst them are adding checked values to existing ones or just setting checked values. The title is the next part that can be modified, and if you don’t want one, you can just leave the text part empty.
Not only this, but you can also add CSS classes and decide if you want to show Exit Confirmation, a popup letting you know you’re leaving the page when the link is clicked or not.
Last, you can choose an icon and choose from an Image, Dashicon, and Font Awesome for your icon, and again choose where you want to position it. After deciding which options you want to choose and how you want your link rules to look like, you just add the rules.
To Conclude
This article has described external links and how to modify them. WP Links plugin was our main subject, and we have discussed some of its” features and options like Exit Confirmation and Link Rules, where you can control and take care of your external links.
Everything is fully customizable, so you can choose even the smallest details. Now it is your turn to get WP Links and start taking care of your external links!